Delve into the world of creative baking with a unique twist – crafting a dirt bike cake. Whether it's for a birthday, a special occasion, or simply to surprise a two-wheel aficionado, this guide will walk you through the steps to create a visually stunning and delicious masterpiece. Get ready to combine your passion for baking with the thrill of off-road adventures!
Gathering Ingredients and Supplies: Before you kick-start the baking process, make sure you have all the necessary ingredients and supplies. You'll need basic cake ingredients such as flour, sugar, eggs, and butter, as well as baking powder and vanilla extract for flavor. Additionally, gather fondant or modeling chocolate in various colors to sculpt the intricate details of the dirt bike. Don't forget food coloring gels for vibrant hues and edible glue to secure decorations. Equip yourself with cake pans, rolling pins, sculpting tools, and a steady hand for precise work.
Choosing the Perfect Cake Base: Selecting the right cake base sets the foundation for your dirt bike masterpiece. Opt for a sturdy cake recipe like chocolate or vanilla sponge that can withstand shaping and decorating. Consider baking multiple layers to add height and dimension to your design. Ensure the cake is completely cooled before moving on to the decoration stage to prevent any melting or mishaps.
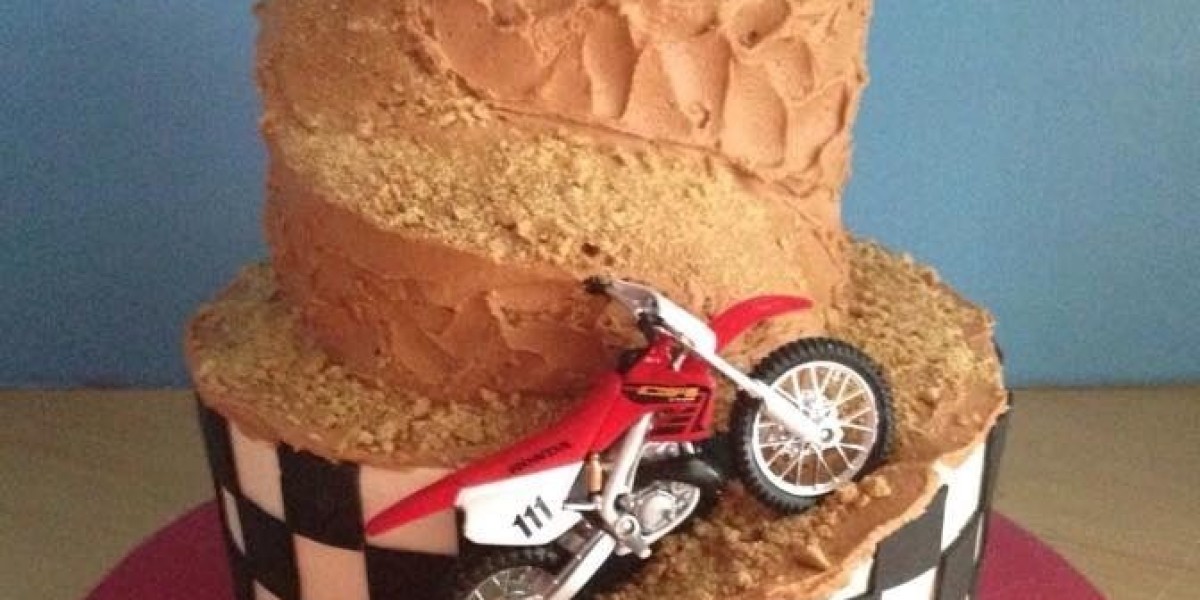
Crafting the Dirt Bike Structure: Begin by sculpting the basic shape of the dirt bike using fondant or modeling chocolate. Reference images of dirt bikes to capture the essence of the design accurately. Shape the body, wheels, handlebars, and other distinctive features with care, paying attention to proportions and details. Use toothpicks or skewers to reinforce delicate parts and allow them to dry and harden slightly before attaching to the cake.
Adding Intricate Details: Now it's time to add the finishing touches that bring your dirt bike cake to life. Use edible paints or food coloring pens to add realistic details such as logos, racing stripes, and sponsor decals. Sculpt tiny accessories like helmets, boots, and goggles from fondant to adorn the cake and enhance its authenticity. Consider incorporating edible metallic paints or dust to create a shiny finish on metal parts for a polished look.
Constructing the Terrain: Enhance the overall theme of your dirt bike cake by crafting a terrain that mimics an off-road track. Use crumbled chocolate cake or crushed cookies to create the appearance of dirt and mud. Arrange edible rocks and vegetation made from fondant or candy to add texture and visual interest. Consider placing toy figurines of riders or spectators to complete the scene and add a sense of action and excitement.
Final Presentation: Once all the elements are in place, step back and admire your handiwork. Carefully transfer the finished dirt bike cake onto a serving platter or cake stand, ensuring stability during transportation. Consider adding a personalized message or inscription to commemorate the occasion. When it's time to serve, slice into the cake to reveal the intricate layers and watch as your guests marvel at your creativity and attention to detail.
Conclusion: Creating a dirt bike cake is not just about baking—it's a journey that combines craftsmanship, creativity, and passion for two-wheel adventures. With careful planning, attention to detail, and a sprinkle of imagination, you can delight friends and family with a delicious and visually stunning masterpiece that pays homage to the thrill of off-road riding. So gear up, rev your engines, and let your baking skills take center stage in this exciting culinary adventure!