Centering an embroidery design is essential for achieving professional results. Whether you are working on a small project or a large piece, the accuracy of your design placement can significantly affect the final outcome. This article will provide you with the best tips on how to center embroidery designs effectively. Additionally, we will explore the importance of converting images to embroidery files and the use of embroidery file format converters, ensuring your designs are compatible with various machines.
Understanding the Importance of Centering Designs
Properly centered designs not only look aesthetically pleasing but also reflect the quality and professionalism of your work. Misaligned designs can result in wasted materials and time, and can detract from the overall appearance of the finished product. Centering is especially crucial when working on items like shirts, towels, and home décor, where symmetry and balance are key.
Best Tips for Centering Embroidery Designs
1. Mark the Center of Your Fabric
Before you start embroidering, it is essential to mark the center of your fabric. This step ensures that your design is placed exactly where you want it. Here’s how to do it:
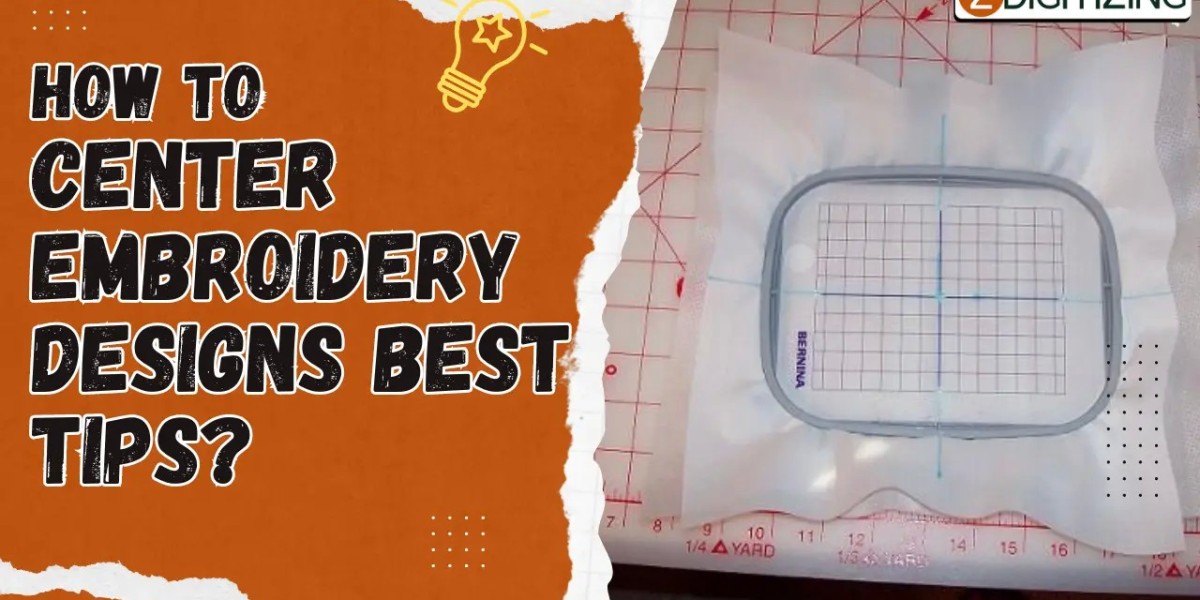
- Fold the Fabric: Fold the fabric in half both horizontally and vertically. The point where the folds intersect is the center of the fabric.
- Use a Fabric Marker: Mark the center point with a fabric marker or chalk. Make sure the marker is water-soluble or disappears with heat to avoid leaving permanent marks on your project.
2. Utilize Embroidery Templates
Embroidery templates are helpful tools for visualizing the placement of your design. Many embroidery software programs allow you to print templates of your designs, which can be placed on the fabric to ensure accurate positioning.
- Print the Template: Print the template of your design from your embroidery software.
- Align the Template: Place the template on the fabric, aligning it with the center mark. Use tape or pins to hold it in place.
- Mark Key Points: Mark key points around the template to guide you when hooping the fabric.
3. Use Hoop Grids
Many embroidery hoops come with grid templates that fit into the hoop. These grids are incredibly useful for aligning your fabric and design.
- Insert the Grid: Place the grid in the hoop.
- Align the Fabric: Position the fabric so that the center mark aligns with the center of the grid.
- Hoop the Fabric: Secure the fabric in the hoop, ensuring it remains aligned with the grid.
4. Centering Tools and Techniques
There are various tools and techniques available to help center your embroidery designs accurately.
- Laser Alignment Tools: These tools project laser lines onto your fabric, helping you align the design perfectly.
- Embroidery Placement Stickers: These stickers can be placed on the fabric to indicate the center and other key points of your design.
- Embroidery Software: Advanced embroidery software often includes alignment features that assist in precise design placement.
Converting Images to Embroidery Files
Before you can embroider a design, it needs to be converted into a format that your embroidery machine can read. This process is known as digitizing. Here’s how to convert image to embroidery file:
Step-by-Step Digitizing Process
- Choose the Right Software: Select embroidery software that suits your needs. Popular options include Wilcom, Hatch, and Brother PE-Design.
- Import the Image: Load the image you want to convert into the software.
- Trace the Design: Use the software’s tools to trace the image. This can often be done automatically or manually for greater precision.
- Assign Stitch Types: Define the different stitch types (e.g., satin, fill, or running stitches) for various parts of the design.
- Adjust Settings: Modify stitch density, length, and direction to optimize the design for embroidery.
- Save the File: Save the design in a format compatible with your embroidery machine (e.g., PES, DST, or JEF).
Embroidery File Format Converters
Embroidery file format converters are essential tools that allow you to change the file format of your embroidery designs, ensuring compatibility with different machines and software programs.
Benefits of Using File Format Converters
- Compatibility: Different embroidery machines use different file formats. Converters ensure your designs can be used on any machine.
- Efficiency: Quickly convert files without the need to recreate designs.
- Quality Preservation: Maintain the integrity and quality of the original design during conversion.
How to Use an Embroidery File Format Converter
- Select the Converter: Choose a reliable embroidery file format converter. Some popular options include Embrilliance Essentials and Wilcom TrueSizer.
- Load the File: Open the original embroidery file in the converter software.
- Choose the Output Format: Select the desired output format compatible with your embroidery machine.
- Convert and Save: Convert the file and save it to your preferred storage device.
Conclusion
Centering embroidery designs is a crucial step in achieving high-quality and professional results. By following the tips outlined in this guide, you can ensure your designs are perfectly placed on your fabric, enhancing the overall appearance of your embroidery projects. Additionally, understanding the process of converting images to embroidery files and using embroidery file format converters will streamline your workflow and ensure compatibility with various embroidery machines. With these tools and techniques, you can take your embroidery skills to the next level and create stunning, precise designs every time.
FAQs About Centering Embroidery Designs
1. Why is it important to mark the center of the fabric before embroidering?
Marking the center ensures that your design is placed accurately and symmetrically on the fabric, resulting in a professional and aesthetically pleasing finished product.
2. Can I use any image for embroidery digitizing?
Not all images are suitable for embroidery. Choose images with clear lines and simple shapes. Complex images may require significant adjustments during the digitizing process.
3. What is the best software for converting images to embroidery files?
Popular embroidery software includes Wilcom, Hatch, and Brother PE-Design. These programs offer comprehensive tools for digitizing and editing designs.
4. How do I ensure my design is centered when using a multi-position hoop?
Use grid templates, alignment tools, and careful marking to ensure your design is centered and aligned correctly when repositioning the hoop.
5. How often should I calibrate my embroidery machine’s alignment?
Regular calibration ensures accuracy. It is recommended to calibrate your machine whenever you notice alignment issues or after performing maintenance.
6. What are the common file formats used in embroidery machines?
Common file formats include PES (Brother), DST (Tajima), JEF (Janome), and EXP (Melco). Using an embroidery file format converter can help you switch between these formats.
7. How can I prevent fabric shifting during embroidery?
Use a good-quality stabilizer, ensure the fabric is taut in the hoop, and consider using temporary adhesive sprays to keep the fabric in place.
8. What tools can help with precise design placement?
Laser alignment tools, embroidery placement stickers, and grid templates are all effective tools for ensuring precise design placement.
9. Can I use embroidery software to adjust the size of my design?
Yes, most embroidery software allows you to resize designs. However, be mindful of stitch density and design details when resizing.
10. How do I convert an embroidery file to a different format?
Use an embroidery file format converter. Load the original file into the converter software, select the desired output format, and convert the file.